An improvised vacuum chamber
Tags:In this note I describe an improvised vacuum chamber made out of stuff I had laying around the house, and some fun things I did with it.
Tools
- rotary vane vacuum pump
- generic, single-stage 47 l/min
- CNC mill
- CNC3020T
- CNC3020T fixture attachment
- own work
- CNC3020T coolant mod
- own work
- flat endmill
- d=1.6mm two flute endmill
- drill
- IKEA cordless drill
- d=5mm drill bit for metal
- generic
- rf power source
- own work, ~32 MHz at up to 60 W input
Materials
- glass jar
- Nescafe 200ml coffee jar
- flat elastomer sheet
- generic latex glove
- vacuum hose
- generic freon charging hose
- plastic tube with OD equal to ID of vacuum hose
- generic
- acrylic sheet
- d=3mm
Fabricating flange adapter
The following is the LinuxCNC parametric G-code that I used for milling this adapter. Being parametric, it can be adjusted for different acrylic thickness, etc.
1
2
3
4
5
6
7
8
9
10
11
12
13
14
15
16
17
18
19
20
21
22
23
24
25
26
27
28
29
30
31
32
33
34
35
36
37
38
39
40
41
42
43
44
45
46
47
48
49
50
51
52
53
54
55
56
57
58
59
60
61
62
63
64
65
66
67
68
69
70
71
72
73
74
75
76
77
78
79
80
81
82
83
84
85
86
87
88
89
90
91
92
93
94
95
96
97
98
99

( Helix-mill a hole. )
( Assumes metric, XY plane, feedrate, and tool compensation are set. )

O<helix_mill> sub
  #<xcenter> = #1 ( [mm] X center         )
  #<ycenter> = #2 ( [mm] Y center         )
  #<radius>  = #3 ( [mm] Hole radius      )
  #<zstart>  = #4 ( [mm] Z start position )
  #<zend>    = #5 ( [mm] Z end position   )

  G0 X[ #<xcenter> - #<radius> ] Y#<ycenter>

  G0 Z#<zstart>
  #<znow> = #<zstart>

  ( Mill out body with several full helical turns )
  O100 while [ #<znow> GT [ #<zend> + #<_zstep> ] ]

    #<znow> = [ #<znow> - #<_zstep> ]
    G2 I#<radius> J0 Z#<znow>

  O100 endwhile

  G2 I#<radius> J0 Z#<zend>

  ( Flat out the bottom )
  G2 I#<radius> J0

O<helix_mill> endsub

( Mill a flat groove. )
( Assumes metric, XY plane, feedrate are set, and no tool compensation. )

O<flat_groove> sub
  #<xcenter> = #1 ( [mm] X center         )
  #<ycenter> = #2 ( [mm] Y center         )
  #<sradius> = #3 ( [mm] Starting radius  )
  #<eradius> = #4 ( [mm] Ending radius    )
  #<zpos>    = #5 ( [mm] Z position       )

  #<step> = [ #5410 / 2 ]

  ( Mill out body with several full helical turns )
  O100 if [ #<sradius> GT #<eradius> ]
	  #<rnow> = [ #<sradius> - #<step> ]

	  G0 X[ #<xcenter> - #<rnow> ] Y#<ycenter>
	  G1 Z#<zpos>

	  O110 while [ #<rnow> GT [ #<eradius> + #<step> ] ]
	    G1 X[ #<xcenter> - #<rnow> ]
	    G2 I#<rnow> J0
	    #<rnow> = [ #<rnow> - #<step> ]
	  O110 endwhile

	  G1 X[ #<xcenter> - [ #<eradius> + #<step> ] ]
	  G2 I[ #<eradius> + #<step> ] J0
  O100 else
  O100 endif

O<flat_groove> endsub

( --- BEGIN CONFIGURATION --- )

( 1.6mm cylindrical cutter )
T60 M6 S8000 F200

#<_zsafe>       = 10. ( Safe Z               [mm] )
#<_zstep>       = 1.  ( Pocketing Z step     [mm] )
#<_thickness>   = 3.  ( Acrylic thickness    [mm] )

( --- END CONFIGURATION --- )

( Metric, Absolute, XY plane )
G21 G90 G17

( Spindle on, Coolant on )
M3 M8

( Dwell for 2s )
G4 P2

G0 Z#<_zsafe>
G0 X0 Y0

O<flat_groove> call [0.] [0.] [46. / 2] [40. / 2] [-1.]
G0 Z#<_zsafe>

G41
O<helix_mill> call [0.] [0.] [8.0 / 2 - #5410] [0.] [-#<_thickness>]
G40
G0 Z#<_zsafe>

G42
O<helix_mill> call [0.] [0.] [60. / 2 + #5410] [0.] [-#<_thickness>]

G0 Z#<_zsafe>

M2
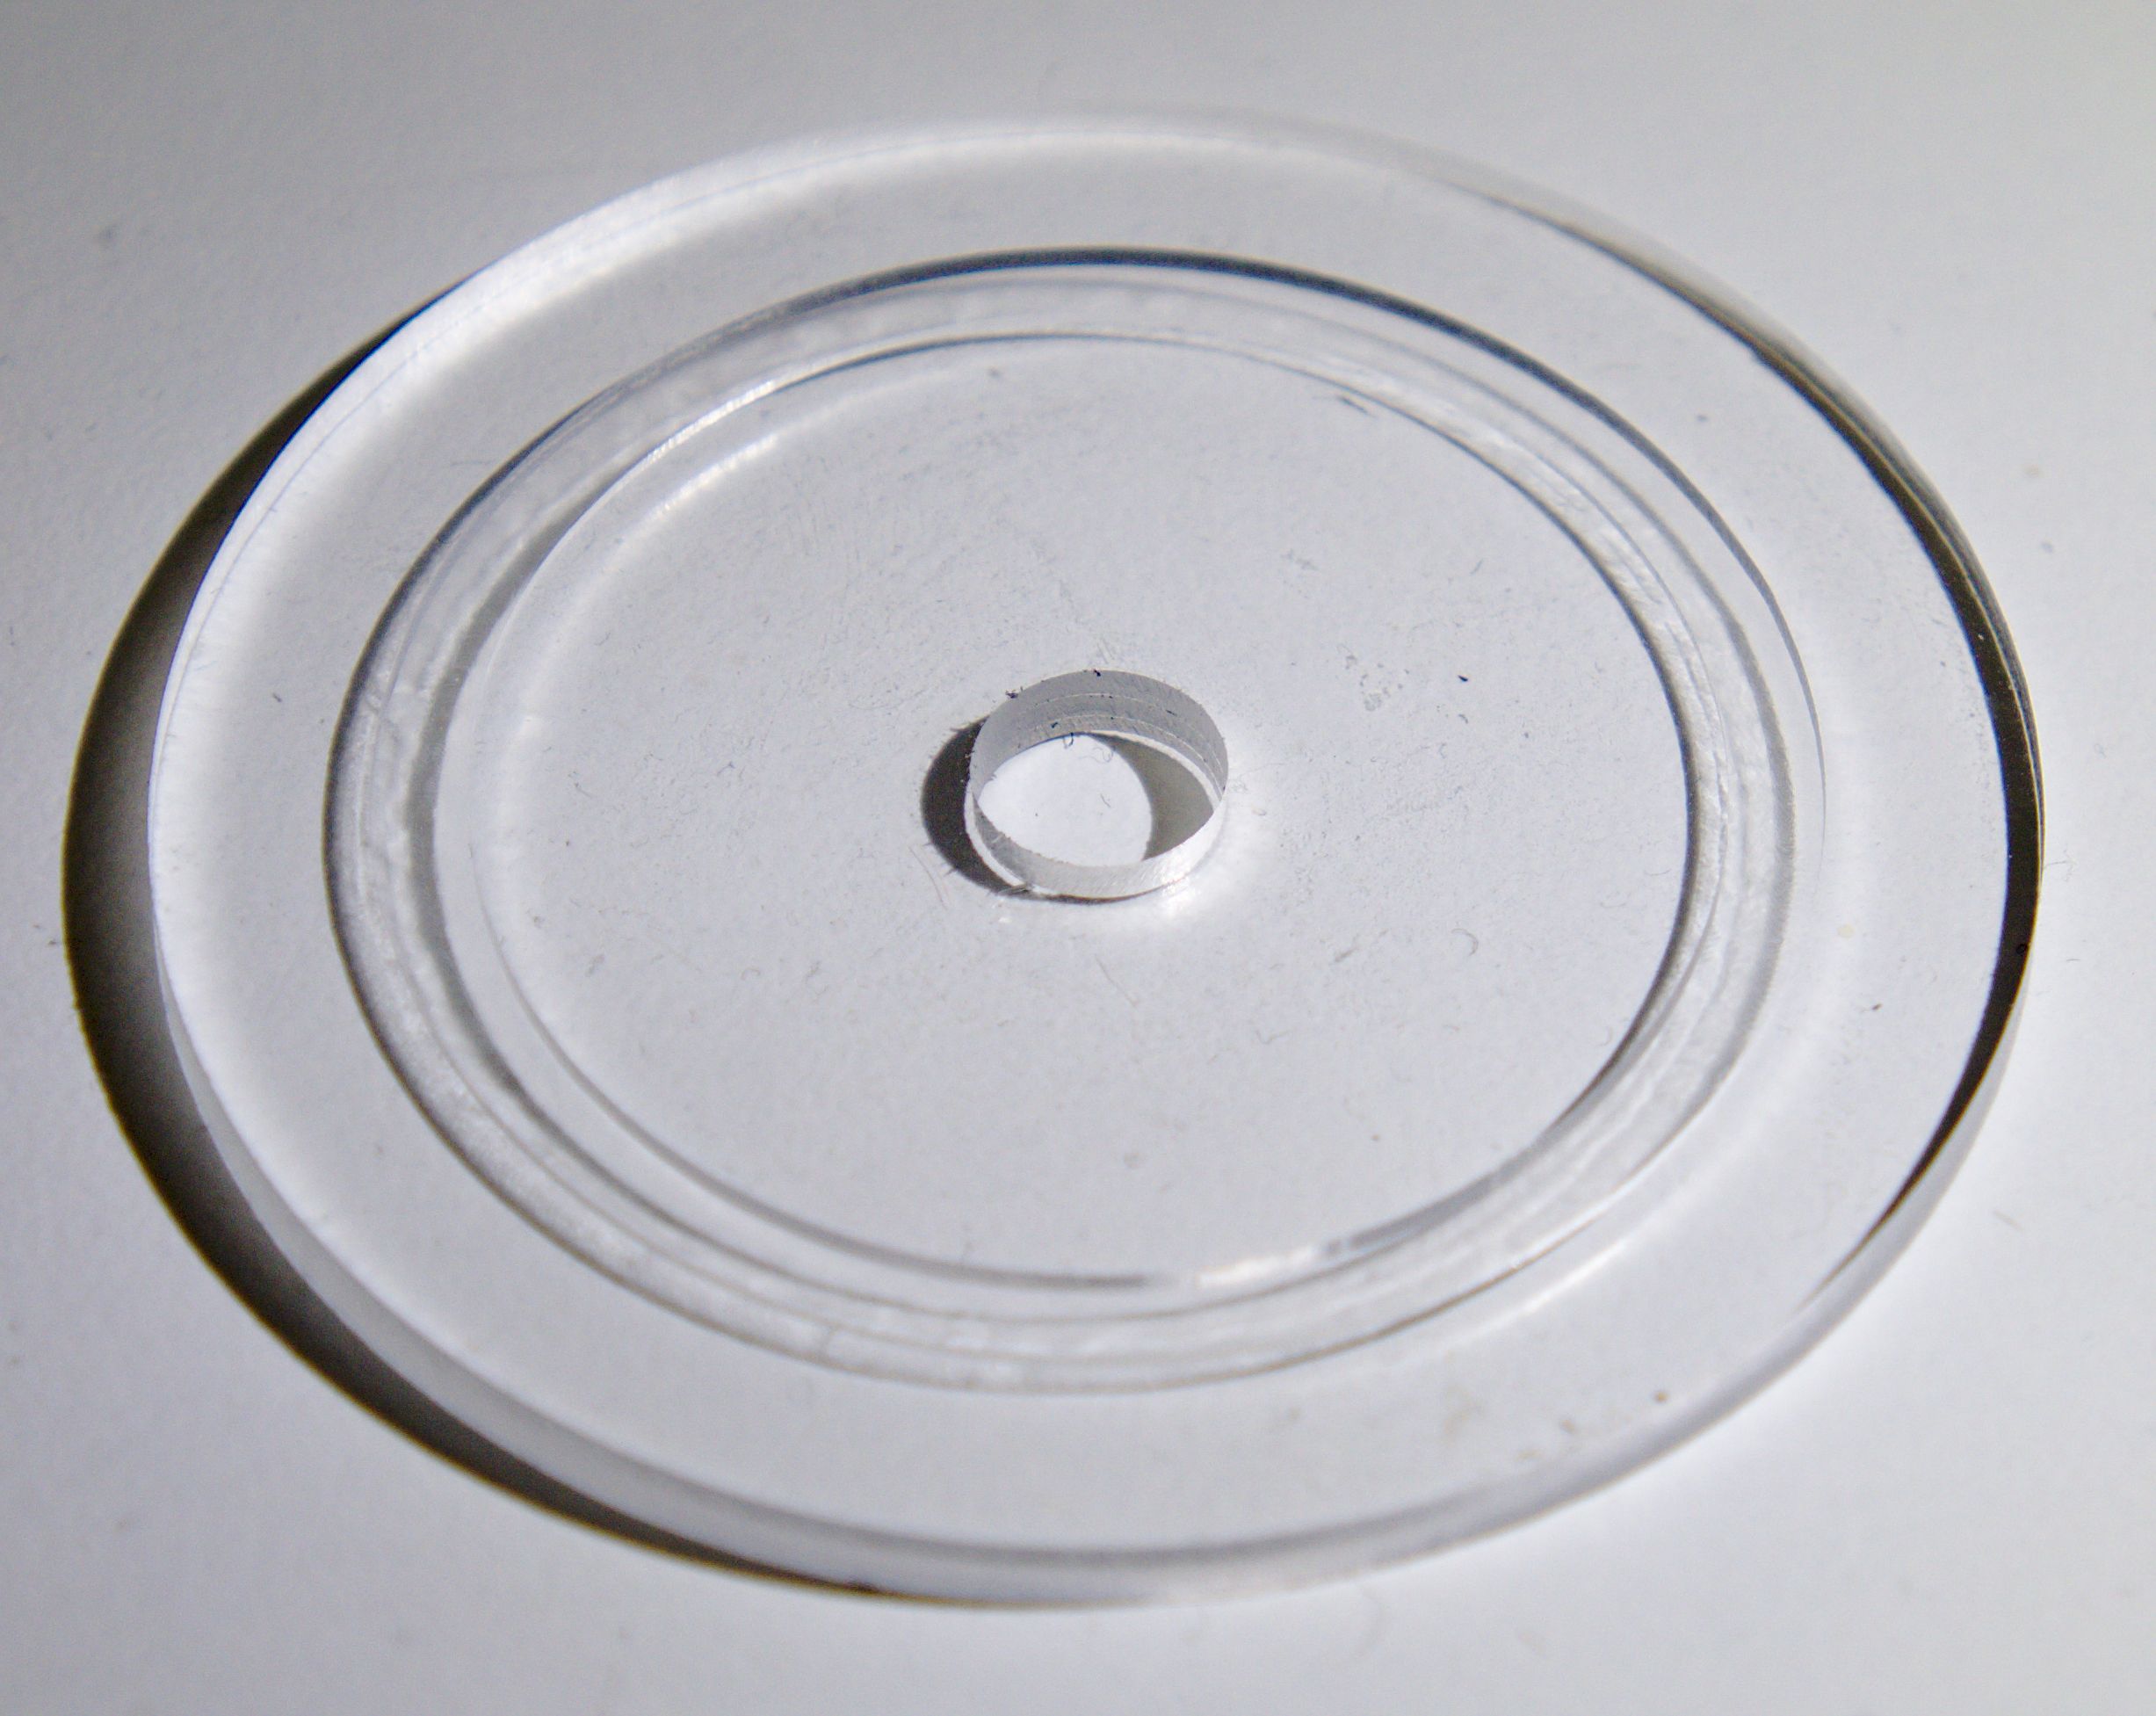
In principle, the adapter can be made without the groove. Then, while it is harder to achieve good sealing, it is possible to fabricate it using only simple manual tools.
Assembling
The overall assembly looks like this when exploded:

The hose is fixed inside the central hole of the flange by inserting it into the hole and then anchoring it there by driving the plastic tube inside the hose:

The elastomer is then cut into rings–one ring was not enough to achieve good seal, so I used two–and placed between the chamber and the flange:

Pumping down
Rotary vane pumps exhibit peculiar behavior at different inlet pressures that allow to roughly monitor the pumping process:
- At the very beginning, the pump will exhaust a lot of oil mist while pumping near atmospheric pressure gas. This should be over in a few seconds.
- Next, the pump will hum for about a minute (for this 200ml chamber).
- Next, the pump starts rattling. This is completely normal, and in fact desirable, as it signifies that the pressure is under 100 Pa.
If the process doesn’t advance to a next stage, it means there is a leak in the chamber.
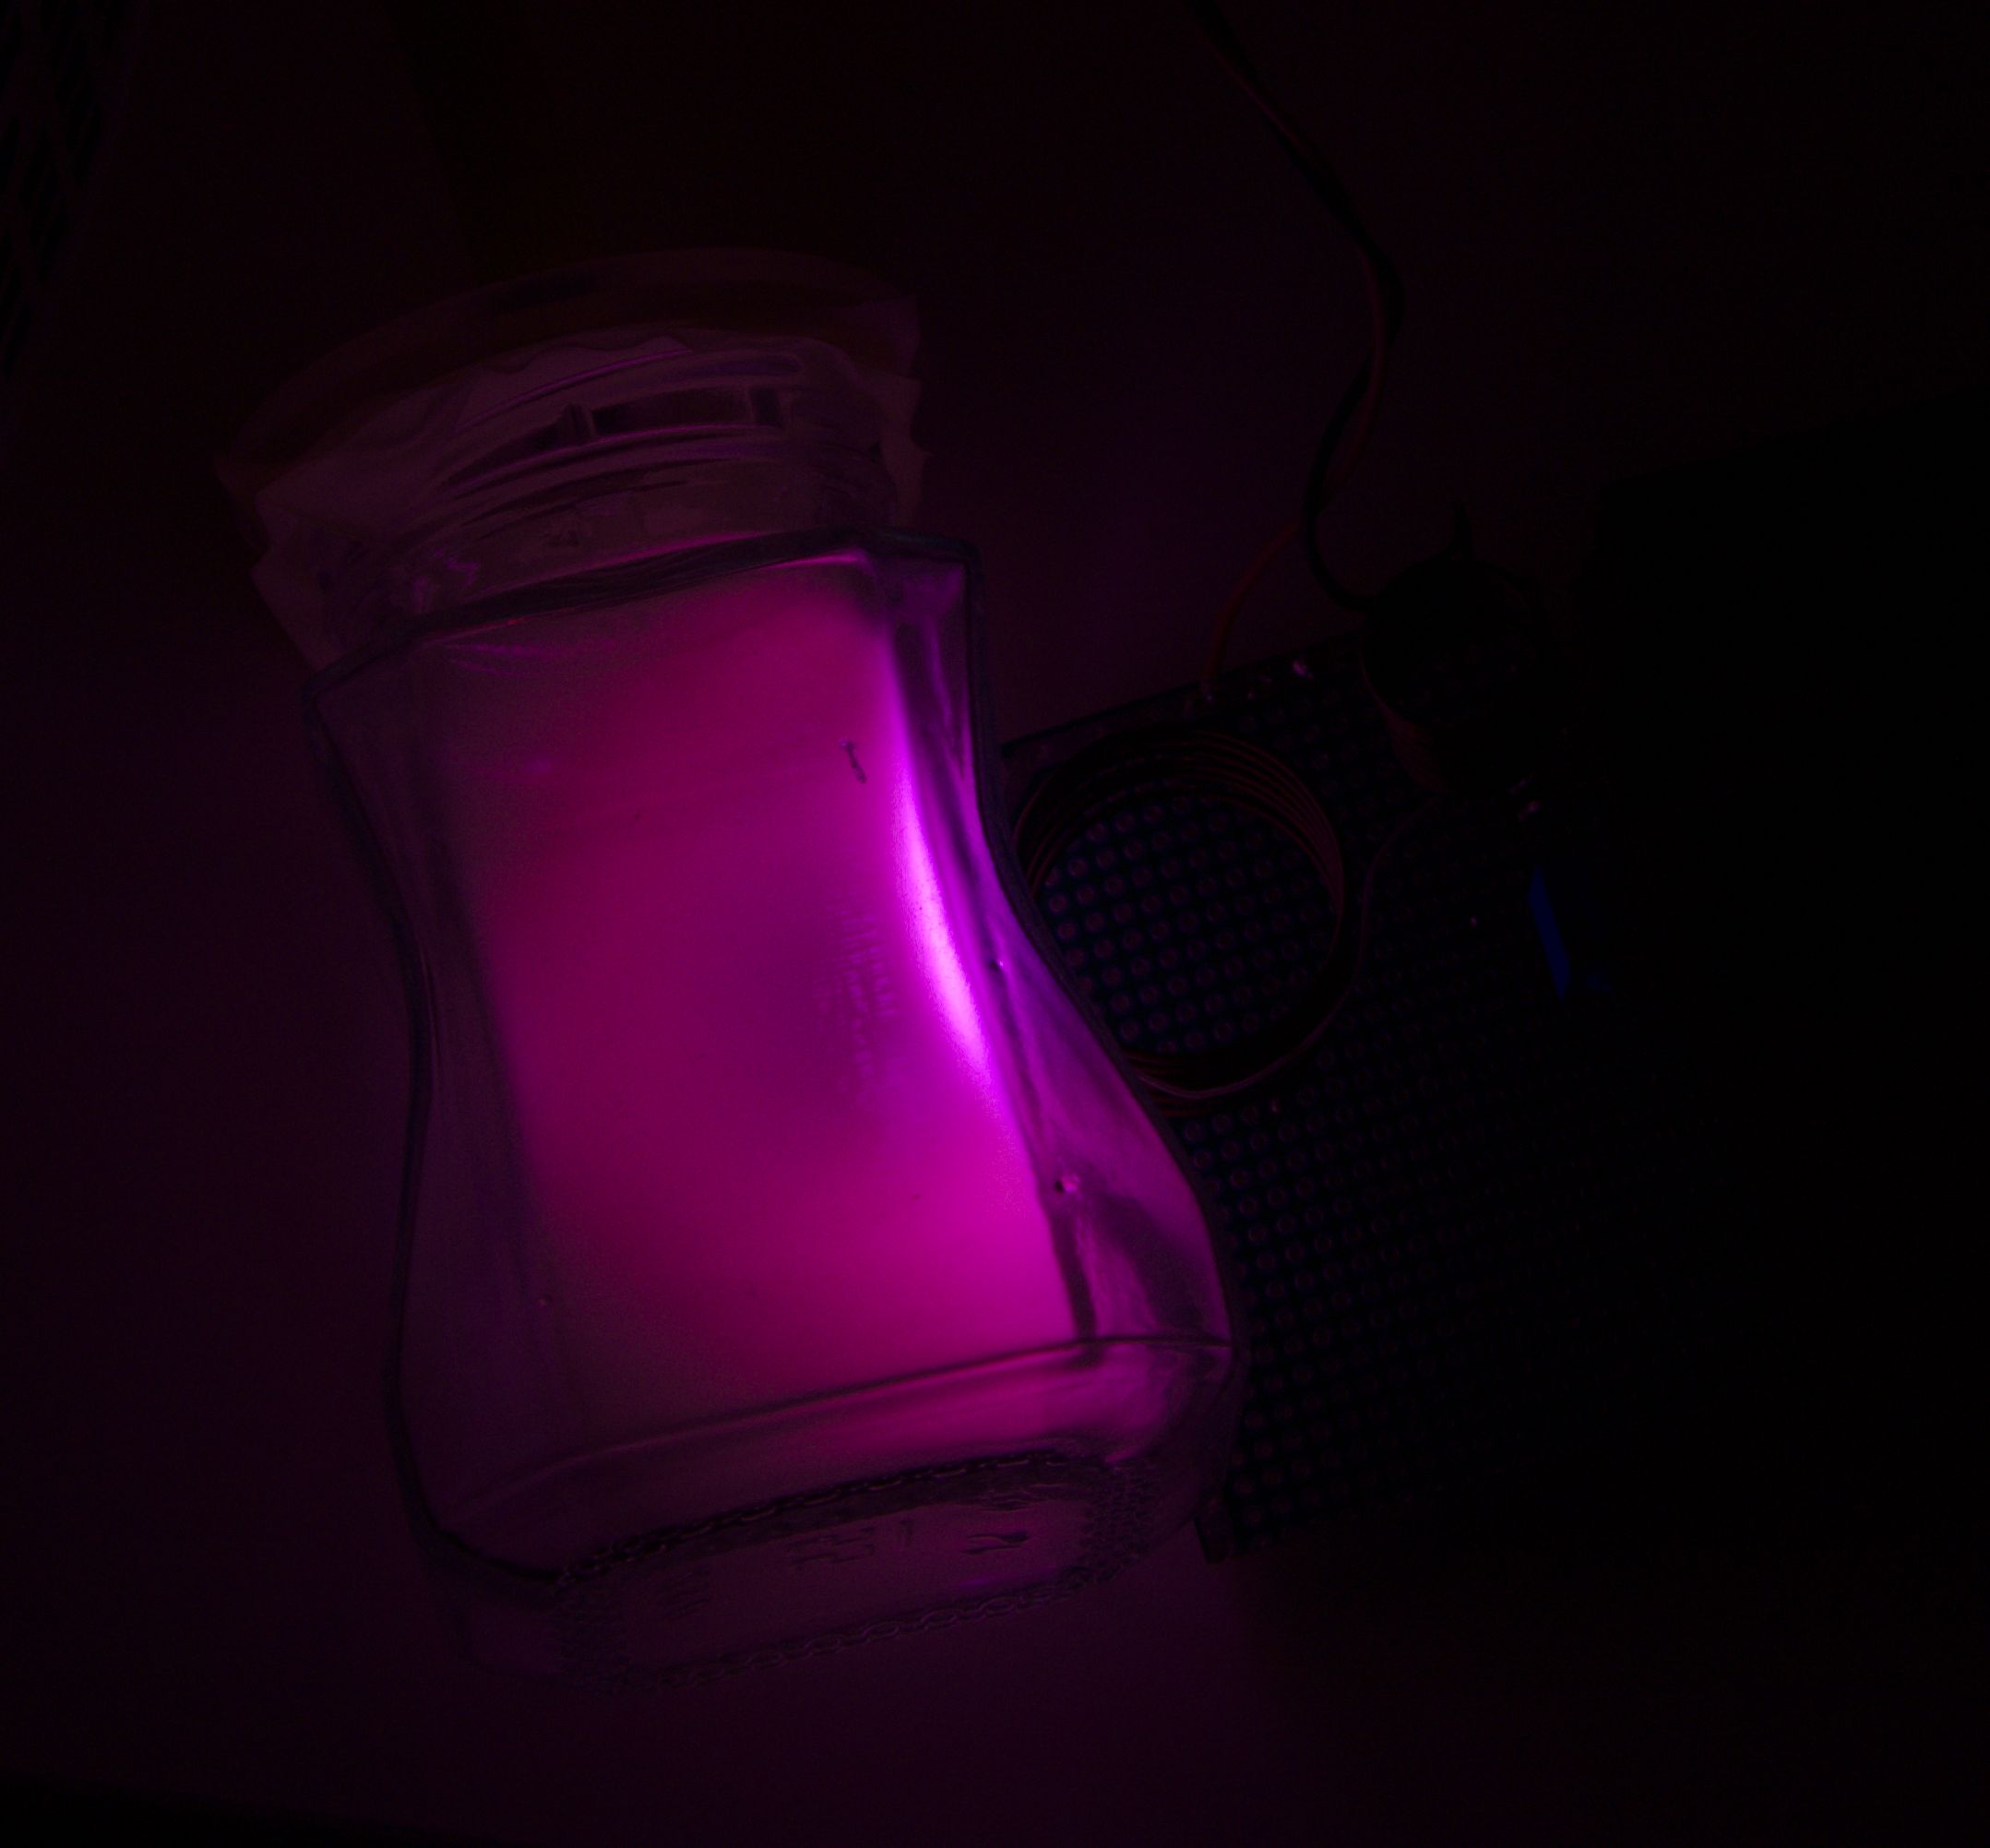
Lighting up
After the pressure is under 100 Pa, a glow discharge can start. Place the chamber near the rf coil and it will start to glow!
I’ve also heated the chamber to ~60°C while pumped down, which caused it to glow white rather than purple, even after it cools down:
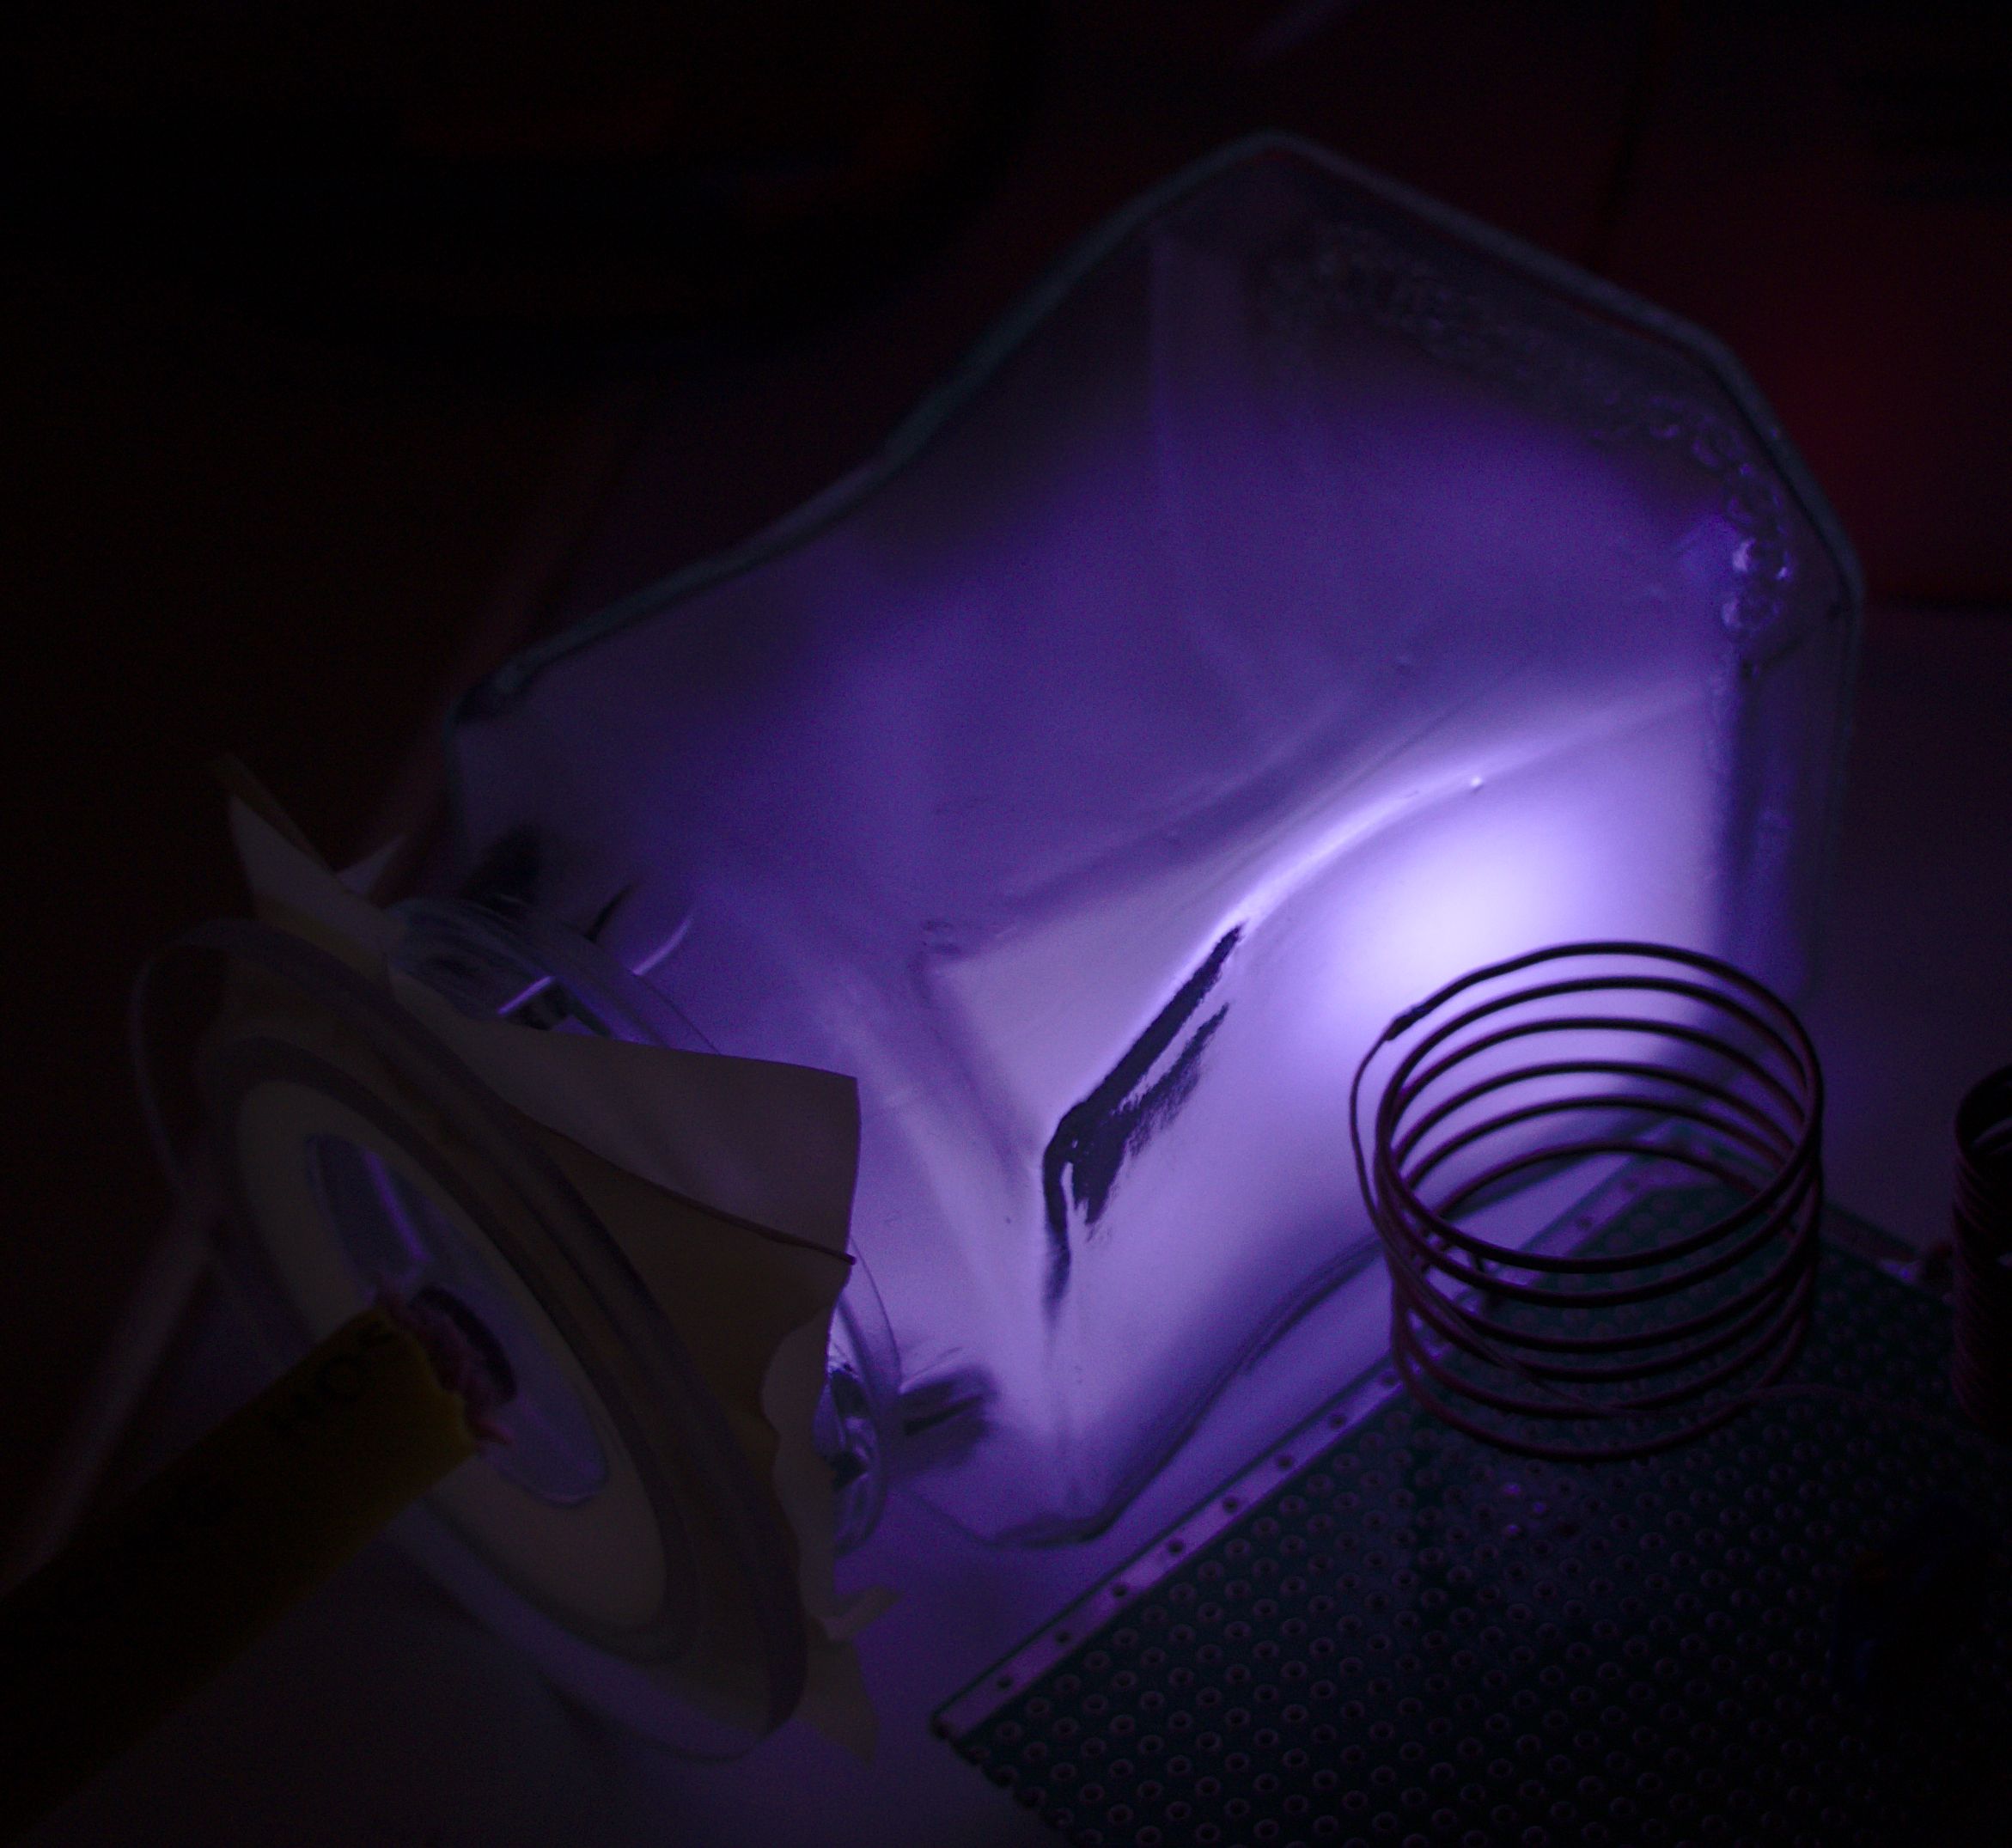
I’m not sure why this happens exactly.